 Help Center
Note that LiveChat can be integrated with SuiteCommerce and SuiteCommerce Advanced.
NetSuite LiveChat: add LiveChat to your SuiteCommerce website and gain an additional channel of communication with your website visitors. With this detailed tutorial, we will guide you through all the necessary steps of the integration process:
- Adding Google Tag Manager module to your NetSuite;
- Linking your Google API OAuth clientID with NetSuite;
- Linking your Google Tag Manager account with NetSuite domain;
- Adding LiveChat to your SuiteCommerce website.
LiveChat for SuitCommerce requires a free Google Tag Manager account. If you don't have one, click here to sign up!
NetSuite LiveChat: Google Tag Manager
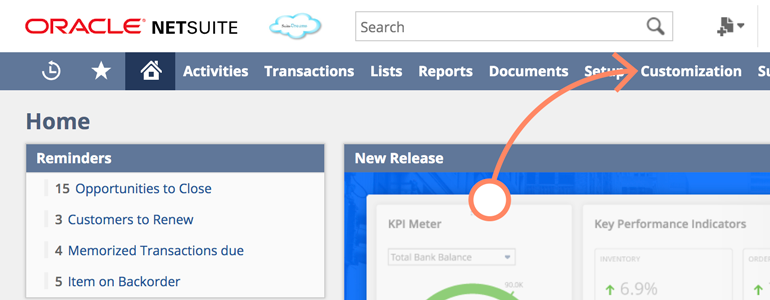
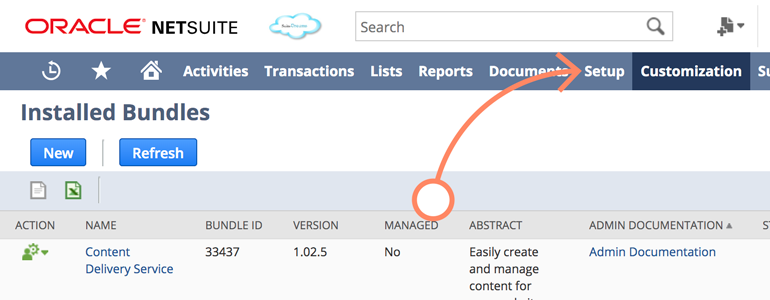
1) First, log into your NetSuite dashboard and go to the Customization section.
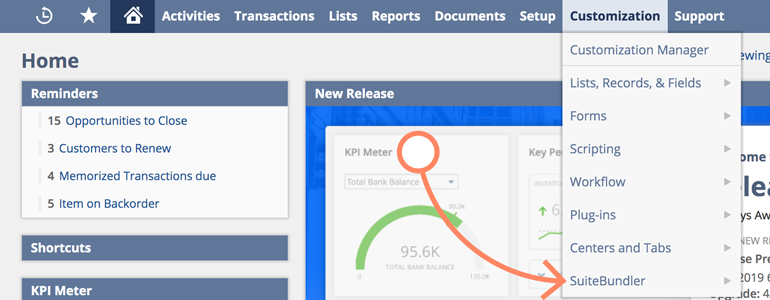
2) Choose SuiteBundler from the list of available options.
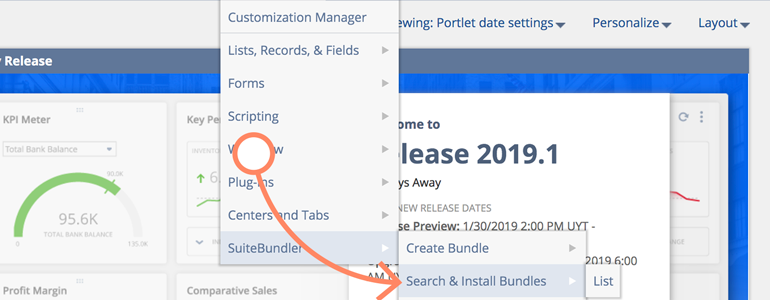
3) Now, click on Search & Install Bundles.
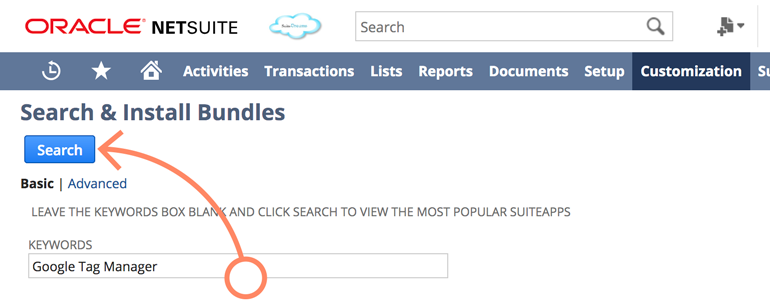
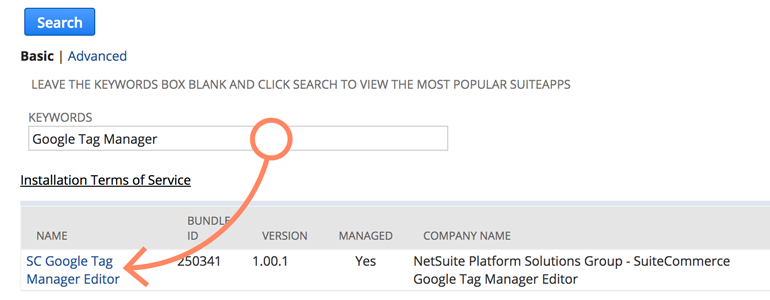
4) On the next section, type Google Tag Manager in the Keyword section and click on Search button.
5) From the list of available bundles, choose SC Google Tag Manager Editor.
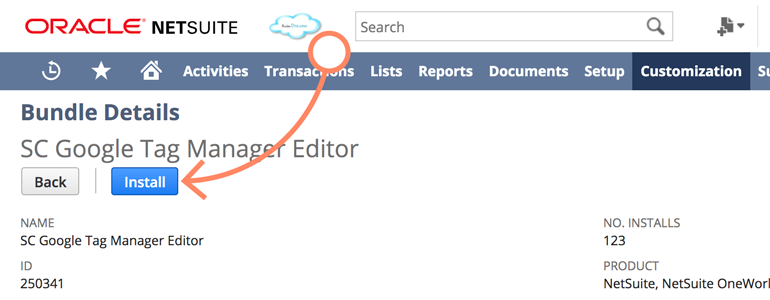
6) Next section will provide you with some details about the package that you'd like to install. To proceed, click on Install button.
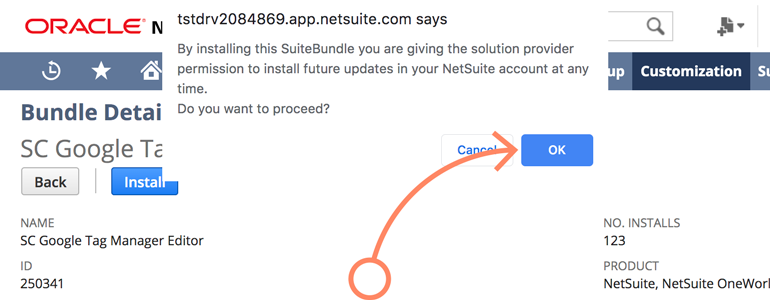
7) You should see a little prompt, asking you to give permissions to the SC Google Tag Manager provider to perform future updates on your NetSuite account. Click on OK to grant permissions and continue.
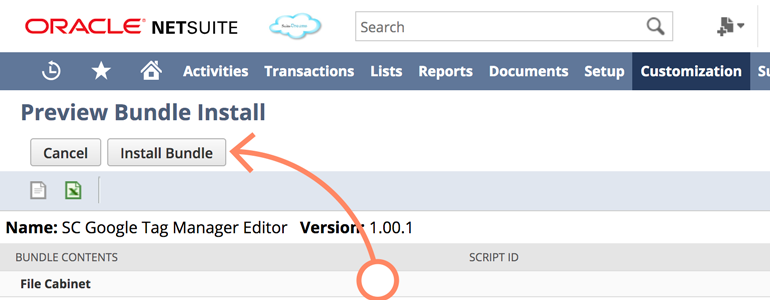
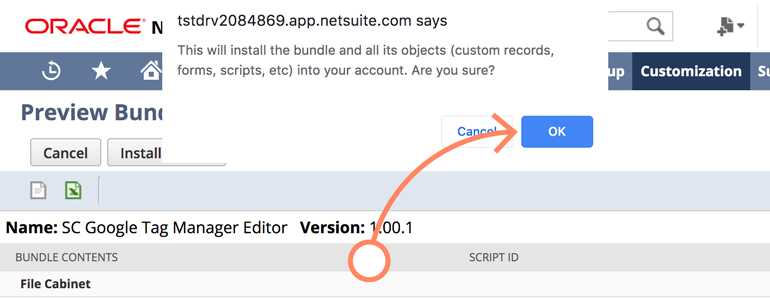
8) You will be taken to the Preview Bundle Update section. While there, click on: Install Bundle.
9) We are almost there! To finalize the installation of SC Google Tag Manager, confirm your action by clicking on OK button.
Done! Now that SC Google Tag manager bundle is installed, it is time to link your Google API OAuth client ID with NetSuite. To learn how to get your OAuth clientID and how to use it in NetSuite, check out the chapter below.
NetSuite LiveChat: Google API OAuth clientID + NetSuite {#google-oauth}
Creating your Google OAuth clientID
OK, so this is a tricky part but don't worry! We will guide you through each required step.
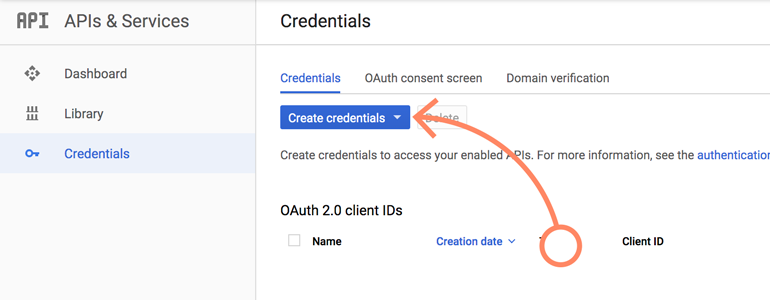
1) First, click here to log into Google API Credentials Console. While there, click on Create credentials button.
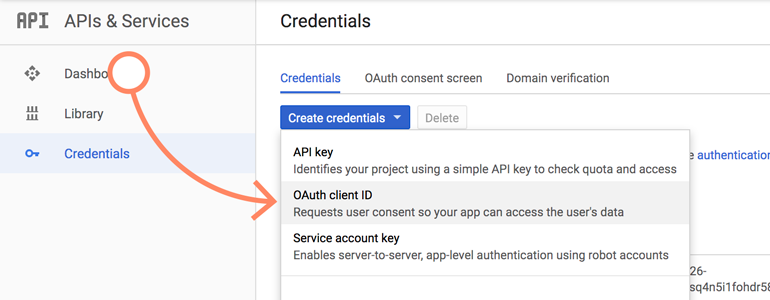
2) From the list of available options, choose OAuth client ID.
3) Pick Web application as a type of app that you want to create.

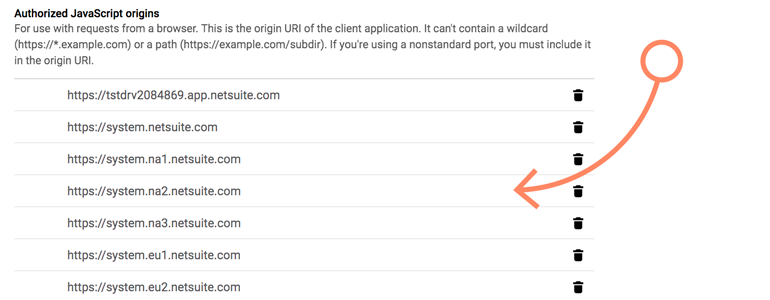
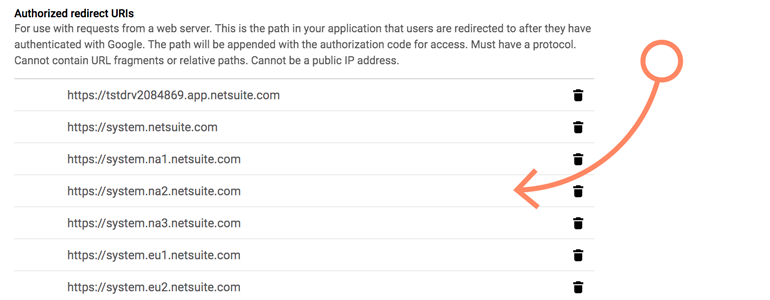
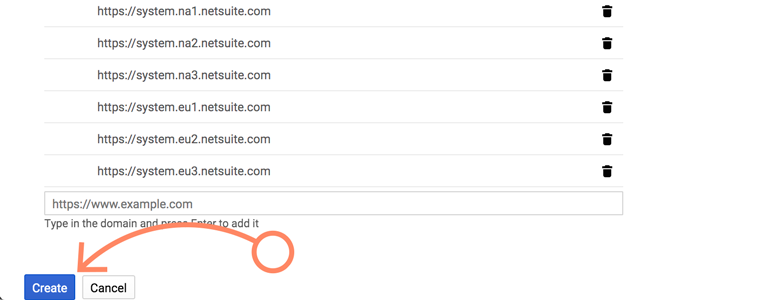
4) Now it's time to set up the Authorized JavaScript origins and Authorized redirect URIs. To do that, copy the values from below and paste them, one by one, into the corresponding fields.
- Authorized JavaScript origins
Your NetSuite account URL https://system.netsuite.com https://system.na1.netsuite.com https://system.na2.netsuite.com https://system.na3.netsuite.com https://system.eu1.netsuite.com https://system.eu2.netsuite.com https://system.eu3.netsuite.com
- Authorized redirect URIs
Your NetSuite account URL https://system.netsuite.com https://system.na1.netsuite.com https://system.na2.netsuite.com https://system.na3.netsuite.com https://system.eu1.netsuite.com https://system.eu2.netsuite.com https://system.eu3.netsuite.com
5) After pasting all the addresses, click on Create to continue.
6) All that is left is to copy the client ID generated for your account.
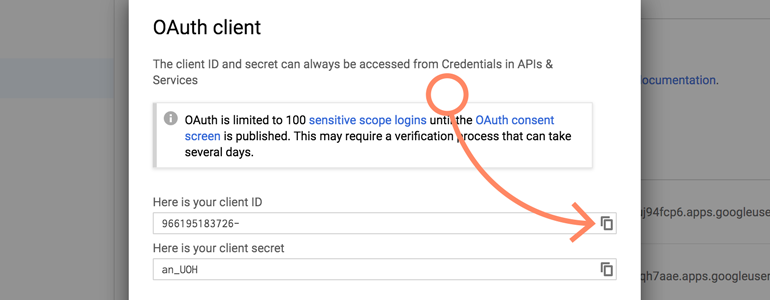
And that's it: your client ID is now ready, and we can link it with NetSuite. Let's see how to do that.
Link Google's client ID with NetSuite
1) Now, go back to your NetSuite dashboard. While there, go to Setup section.
2) From the options available in Setup Manager, choose Company → General Preferences.
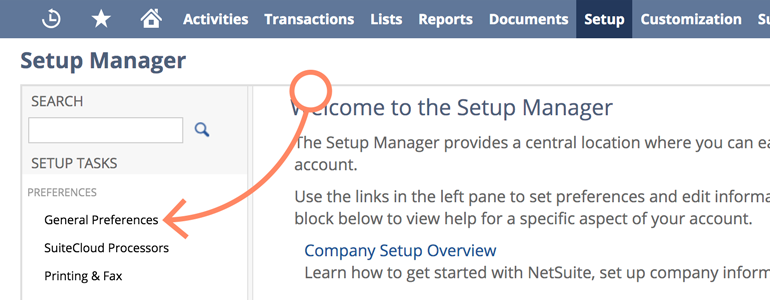
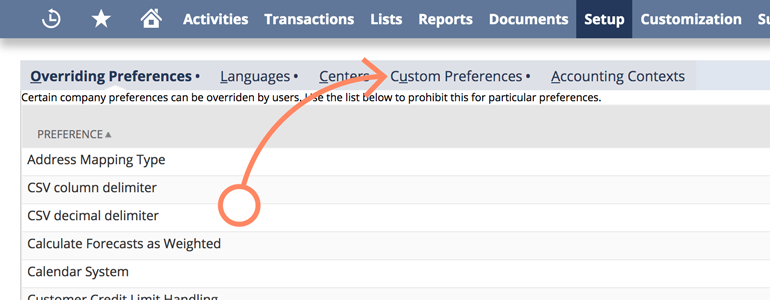
3) General Preferences consists of different sections that you can configure. The one that we are interested in is called Custom Preferences.
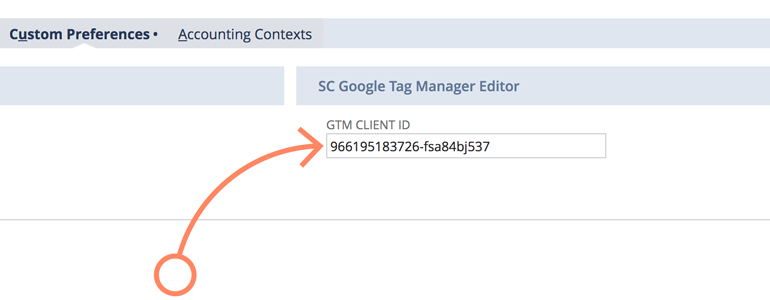
4) To finalize this step, you will need to paste the Google Tag Manager client ID that you created before...
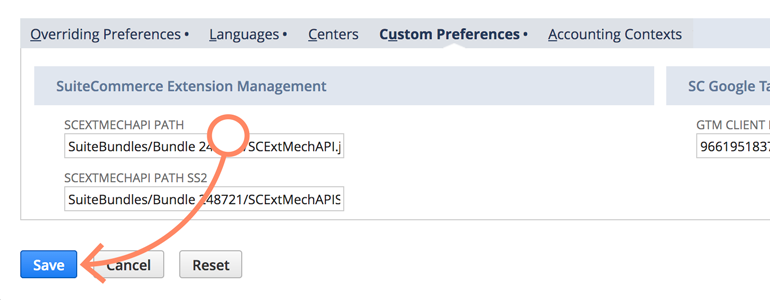
5) And Save changes to your current configuration.
It may feel like a long ride, but I promise: we're halfway there. Now that the GTM client ID is ready, let's link Google Tag Manager with your NetSuite domain.
NetSuite LiveChat: link GTM with NetSuite domain {#link-gtm-with-domain}
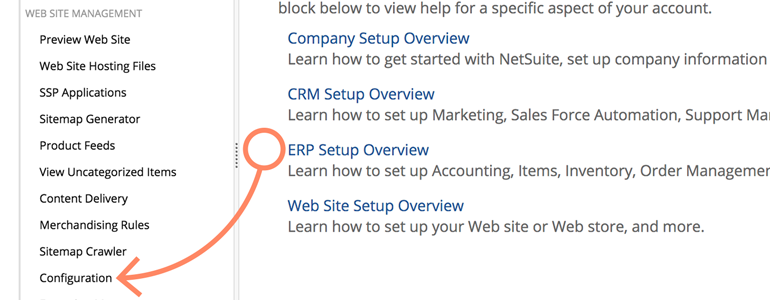
1) To link Google Tag Manager with your NetSuite domain, let's go back to Setup manager for a bit.
2) As a next step, go to SuiteCommerce Advanced section.
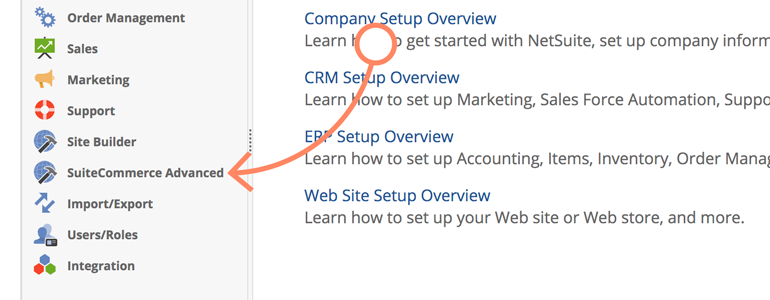
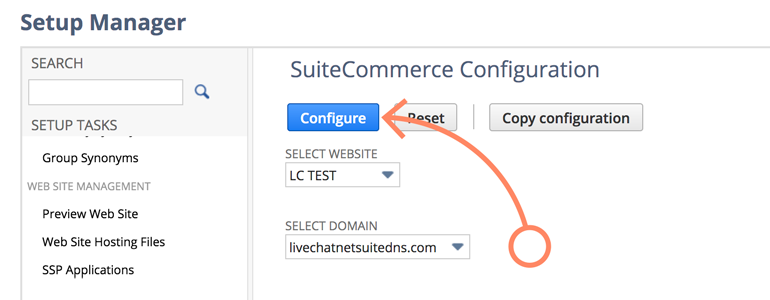
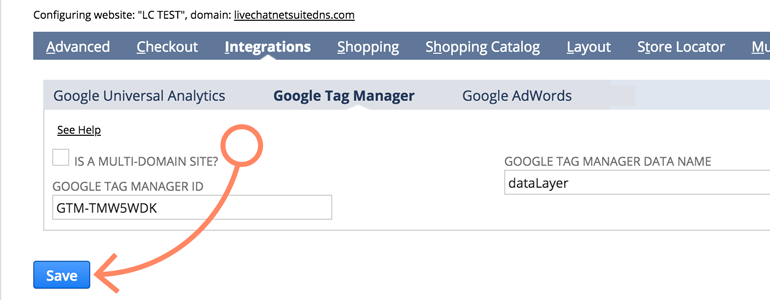
3) Now proceed to the Configuration menu, where you will be able to choose which NetSuite domain would you like to link with Google Tag Manager.
4) Choose which of your NetSuite website and domain would you like to link with Google Tag Manager. Once you've done that, click on the Configure button.
5) On the next screen, proceed to Integrations → Google Tag Manager.
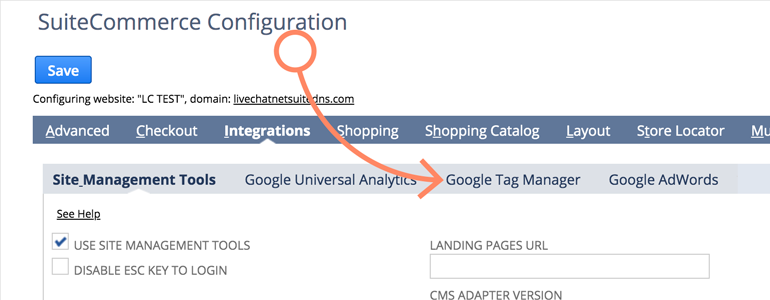
6) As a final step, provide the ID of your Google Tag Manager and click on Save button.
Now that the Google Tag Manager is linked with your NetSuite, there is one final step: adding LiveChat to your SuiteCommerce website! To learn how to do that, check out the chapter below – and this one will be our last. 🙂
NetSuite LiveChat: Add LiveChat to your SuiteCommerce
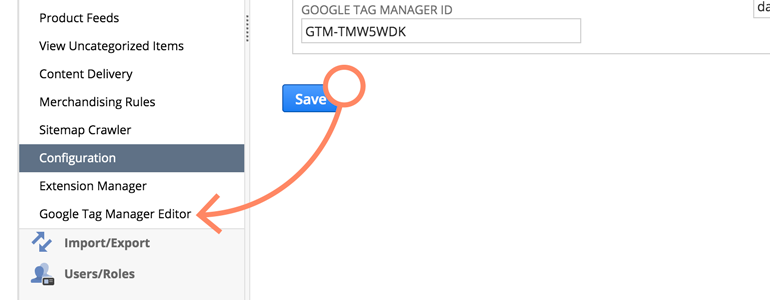
1) For the last time during the configuration, let's proceed to the Setup section of your NetSuite dashboard.
2) While there, proceed to the SuiteCommerce Advanced section.
3) From the list of available options, choose Google Tag Manager Editor.
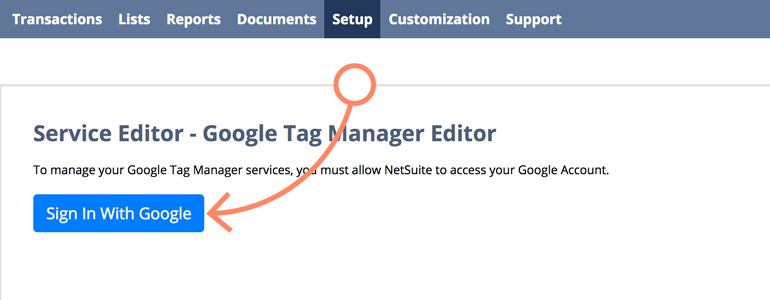
4) Google Tag Manager Editor will greet you with the Sign In with Google button. Click on it to proceed.
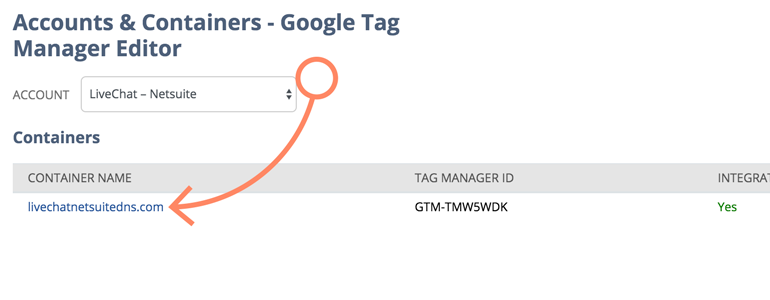
5) Now that you're signed in, choose your Google Tag Manager account and click on the container that you want to edit.
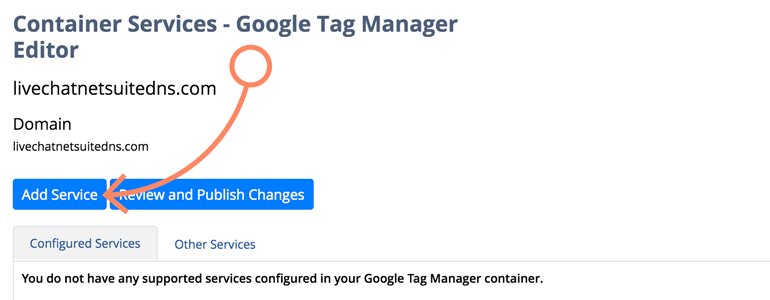
6) To proceed, click on Add Service button.
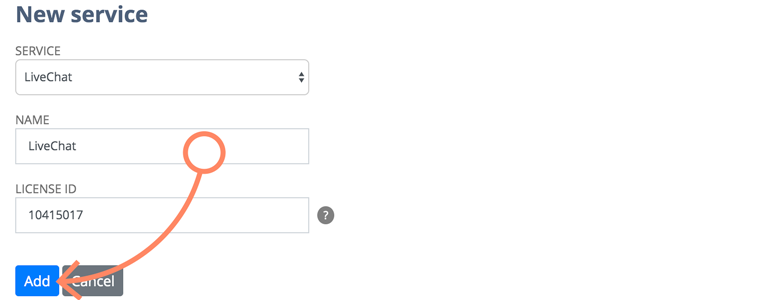
7) Now, from the list of available services choose LiveChat, name your service and provide your LiveChat license number.
After doing all that, click on Add button to proceed.
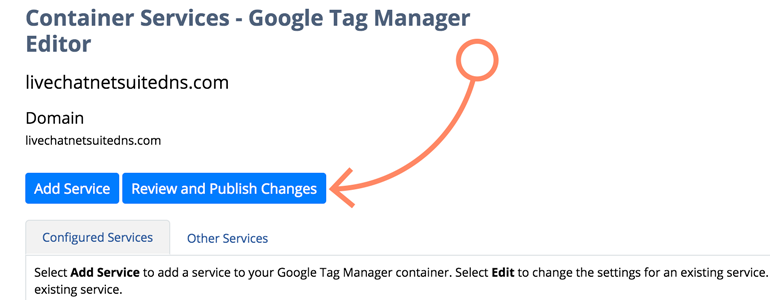
8) It is time to Review and Publish Changes – clicking on that button will redirect you to your Google Tag Manager dashboard.
9) While in your Google Tag Manager, click on Submit button, available at the top right section of your dashboard.
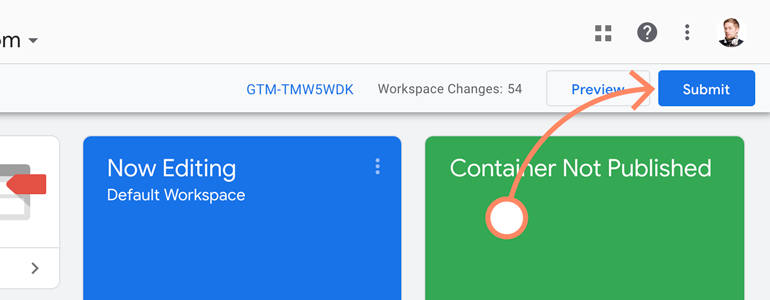
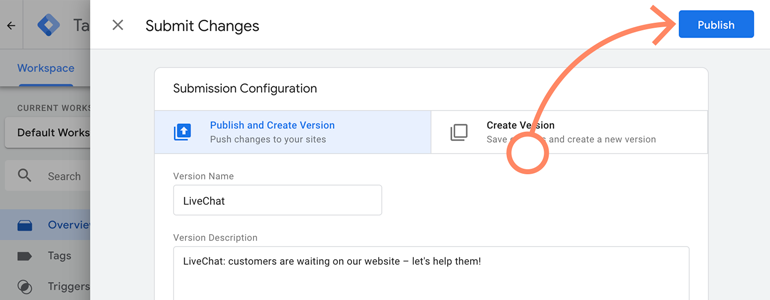
10) Google will ask you to name the change that you are about to submit and briefly describe what this change is all about. Once you've done that, click on Publish to continue.
Woohoo! 🎉 🎊 🙌 The process of implementing LiveChat on your SuiteCommerce website is now finished, and you can start helping your customers right away.
Oh, and one more thing: click here to check out our official Handbook for Agents. It will not only allow you to become a force to be reckoned with (in fields of Customer Service) but will also guide you through each session available in our LiveChat application.