 Help Center
Announcements are a customer engagement feature that can help you create urgency. They are displayed to each customer once per lifetime, so the customer can either jump on the opportunity they announce then and there, or they can start a chat to find out more. It really is a win-win situation!
Announcements can be used to announce flash sales, introduce new releases, invite customers to events, communicate business interruptions, and much more.
Not sure how to set up announcements? Check out this article.
Sales and marketing
Announcements are a great tool for letting your customers know about limited-time offers. You can offer a discount to only a segment of your audience, e.g., only the returning visitors or ones coming from social media campaigns. Use the announcement conditions to target these specific visitors.
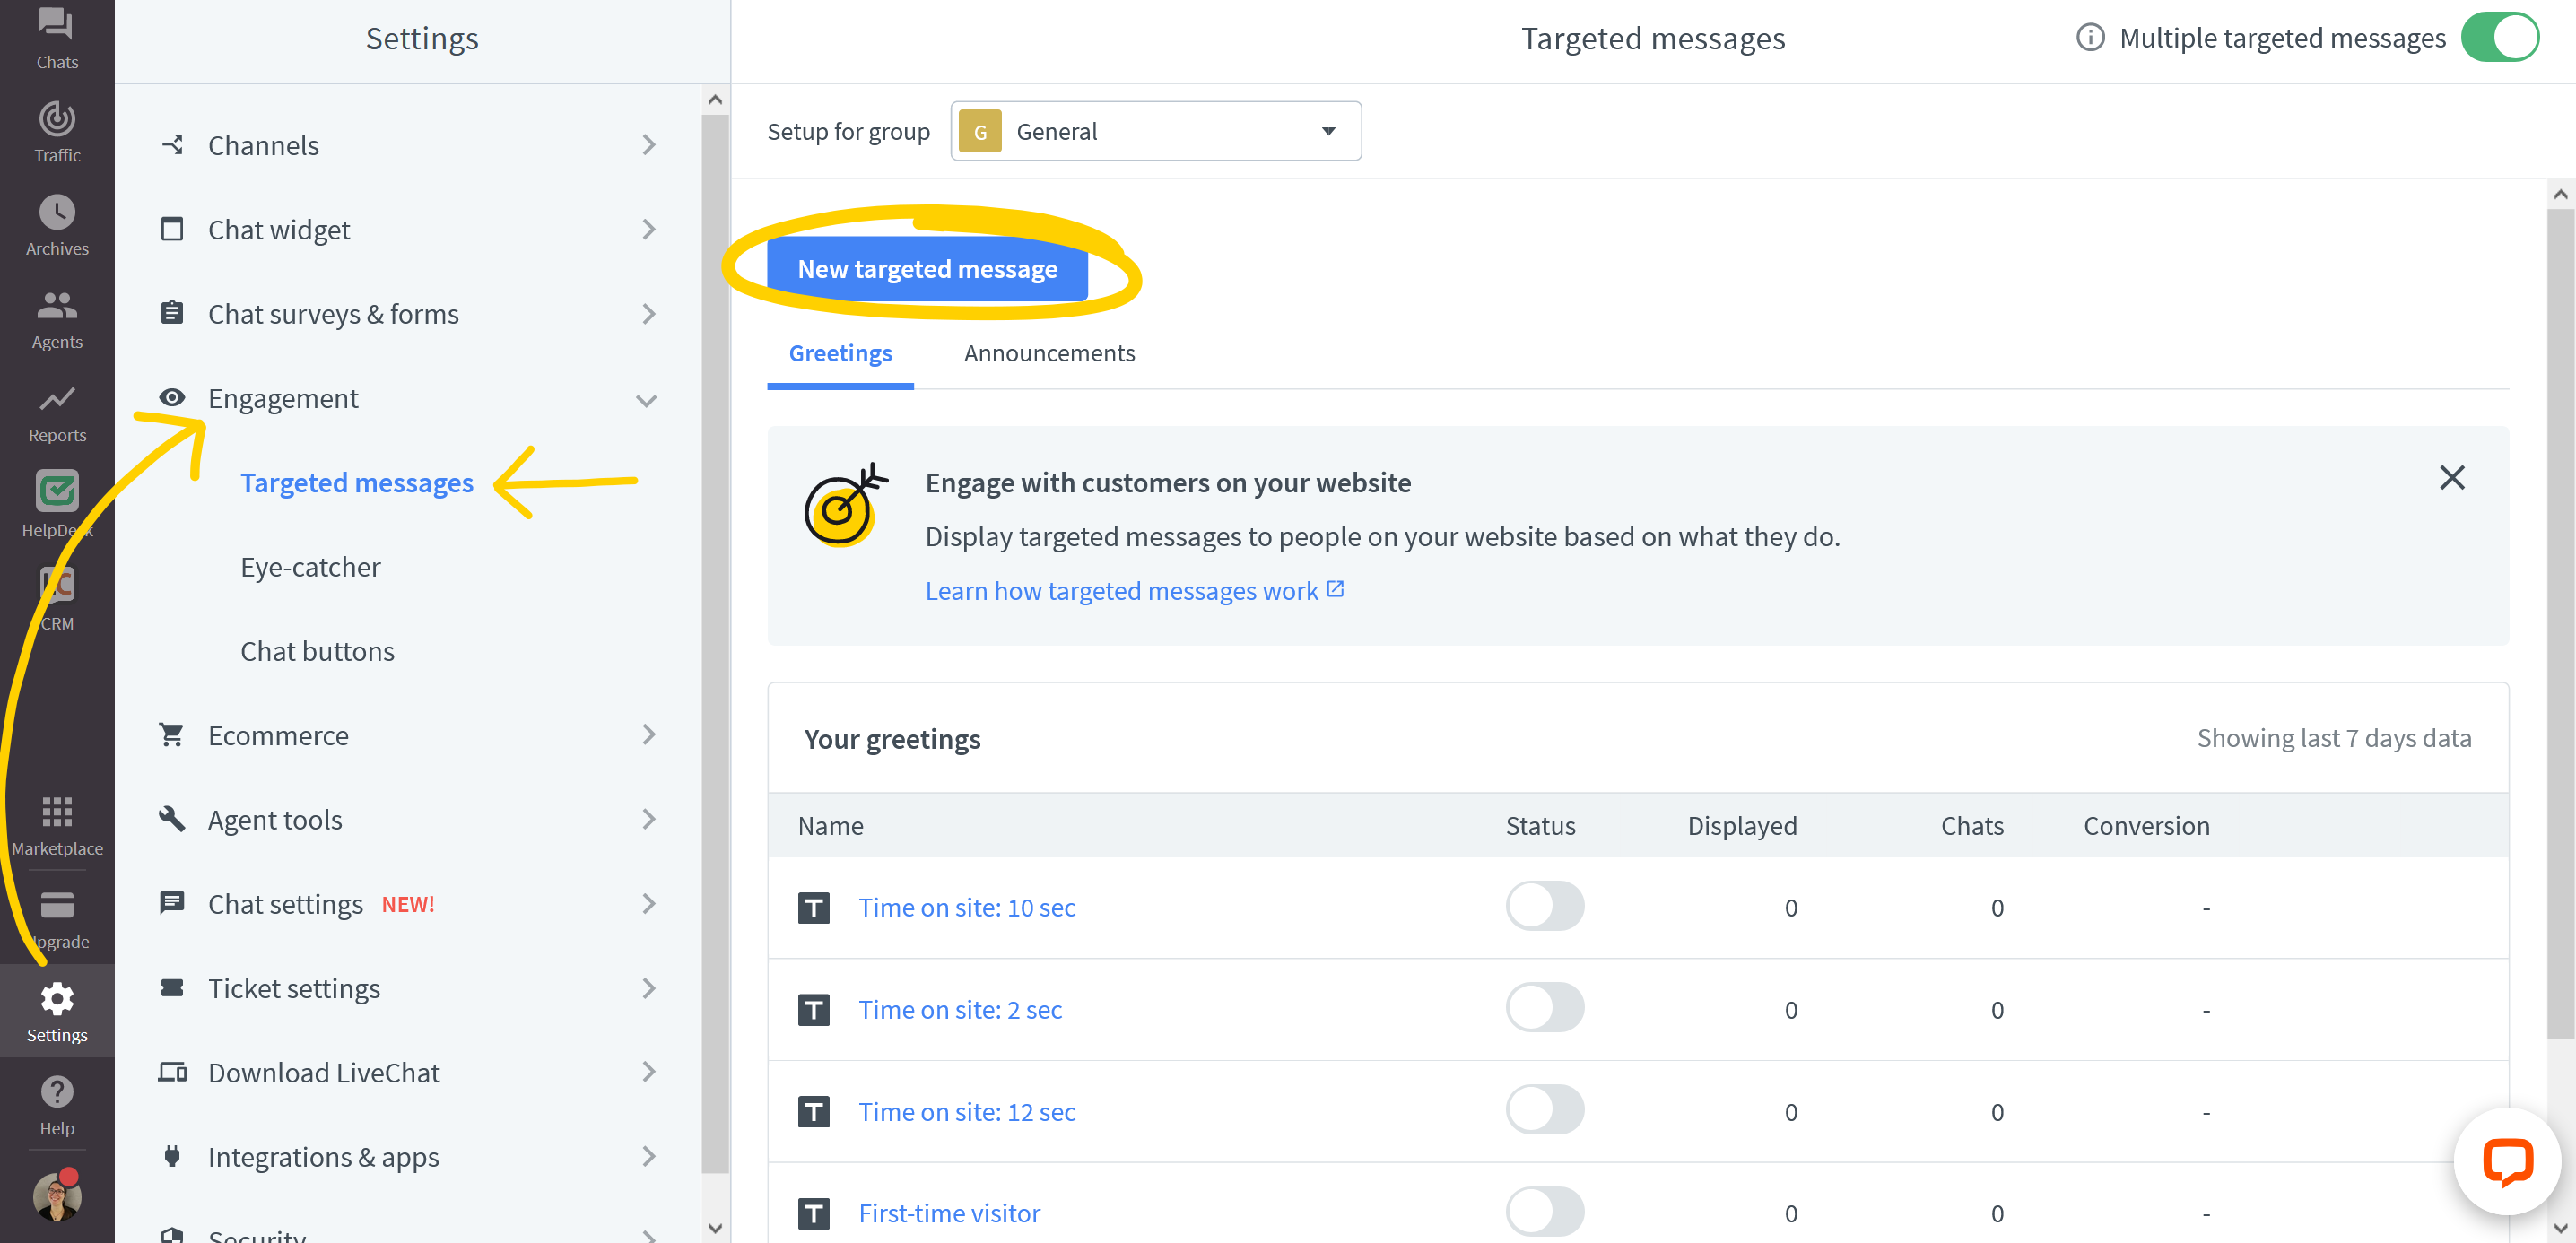
To set up an announcement like the one above, go to Settings> Engagement> Targeted messages in your LiveChat agent app and click on “New targeted message.”
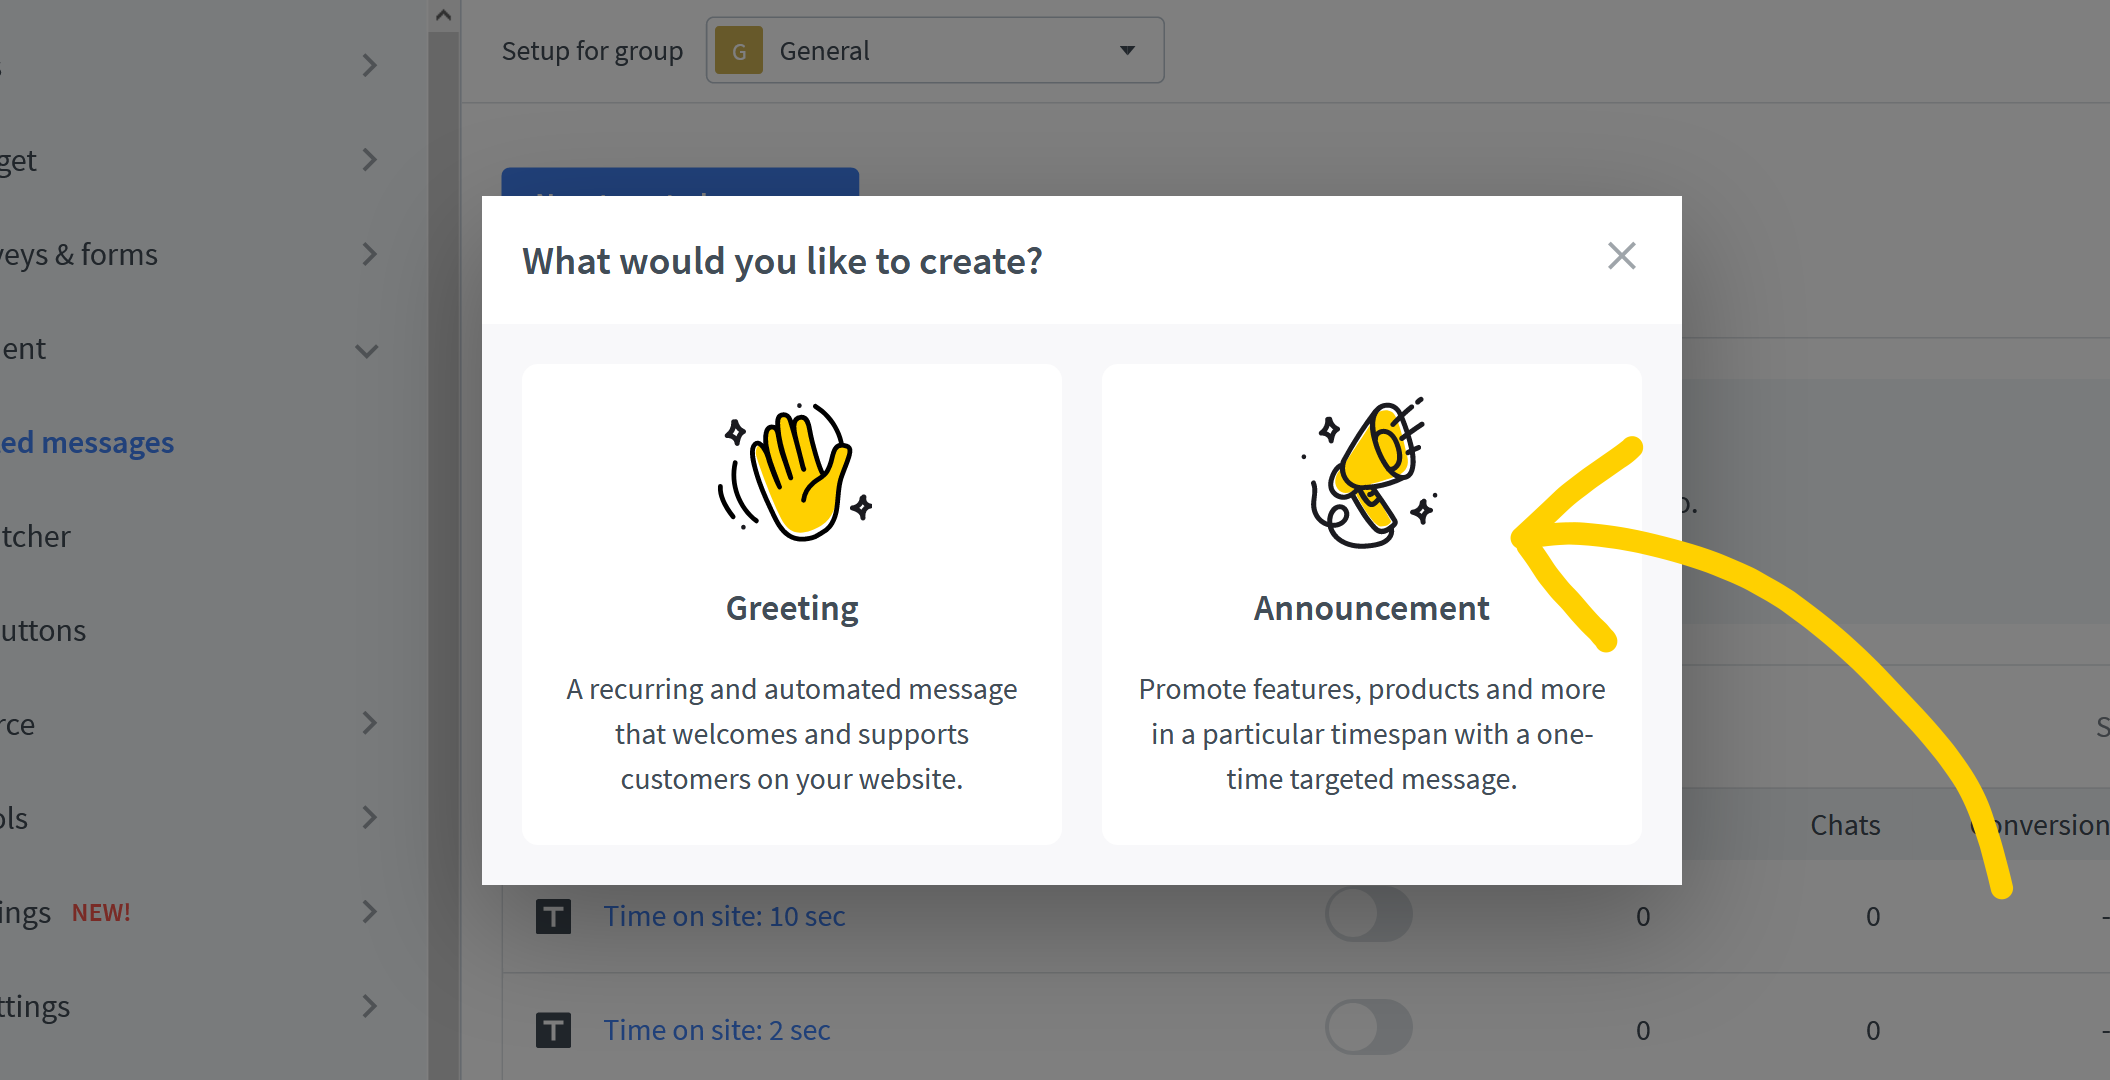
In the pop-up, choose “Announcement”.
The next step is exactly the same as with greetings. First, you choose the look of the announcement. You can choose from Card, Quick replies, or Plain text. To set up an announcement exactly like the one in our example, pick the card type, add your image, and add an “Open URL” button with a link to your Christmas deals page. Once you’re ready, click on “Next: set conditions.”
With announcements, you can decide on the timeframe for when your announcement should be displayed to your customers. Each announcement will only be displayed once for every visitor and only in the timeframe you set up. That can be seven days, 30 days, or a custom period. Select the appropriate time from the drop-down menu.
Right now announcements can only be set to start the moment they are created. We will introduce the option to set up announcements ahead of time soon.
Next, set the conditions. Which segments of your website audience should see your announcement? If you are running a campaign on social media, you can set the condition for the referring website address to only display the announcement to visitors coming from this campaign. You can read more about setting up conditions here. You can also choose to only display the announcement to first-time or returning visitors. If you would like the visitors to spend a certain amount of time on your website before they see the announcement, set up a time delay.
You can take advantage of the Google Analytics integration to find the best time to display a greeting.
The integration with Google Analytics will track the number of targeted messages displayed to your visitors. It will also track the number of clicks on buttons in rich greetings and announcements. Each event contains the button ID and content so that you can track the performance of particular buttons.
Once you have set up the conditions, click on “Save announcement.” And that’s it. Your announcement is now live.
What if you have introduced a new feature in your SaaS product? Once again, announcements are the perfect way to let your customers know about that. The announcement is only shown once, so you can whet their interest without pushing the feature on them. If they feel like they missed out, they can always start a chat, right?
The announcement in our example is once again a Card type with Open URL buttons for the sign-up page and the page dedicated to the new release. For the conditions, you can decide to only announce the feature on a specific page using the “Current page URL” condition and only to logged-in users with the Custom variables condition.
Customer communication
Use announcements to invite your customers to events or to keep them informed about business interruptions.
To create an announcement like the one above, pick the card type, add your image, edit the text, and add an “Open URL” button linking to the signup page for the event you are advertising.
For conditions, decide how long the announcement should be displayed (seven days, 30 days, or a custom period) and to which segment of your audience. For example, use “All visitors” condition to show it to both the first and returning visitors. To show it only on a specific page connected with the event, use “Current page URL” condition. If you would like only the logged-in users to see it, use the “Custom variables” condition.
Announcements can also be used to let your customers know about a business interruption.
Let’s say you are planning a break in the service you provide. With announcements, you can keep your customers informed and give them an opportunity to get in touch with you anyway. To set up an announcement like the one above, pick the “Quick replies” type and then edit the text and replies. Next, set conditions like, for example, customer’s browsing time and the current page URL. This way, the announcement will be displayed to the customers looking for information about your availability.
Growing lead base
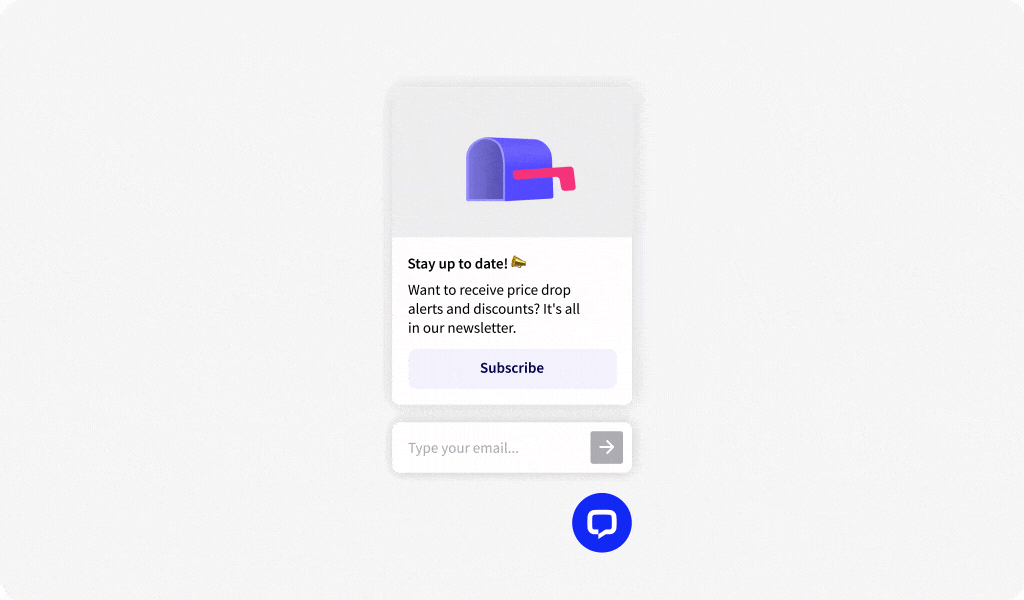
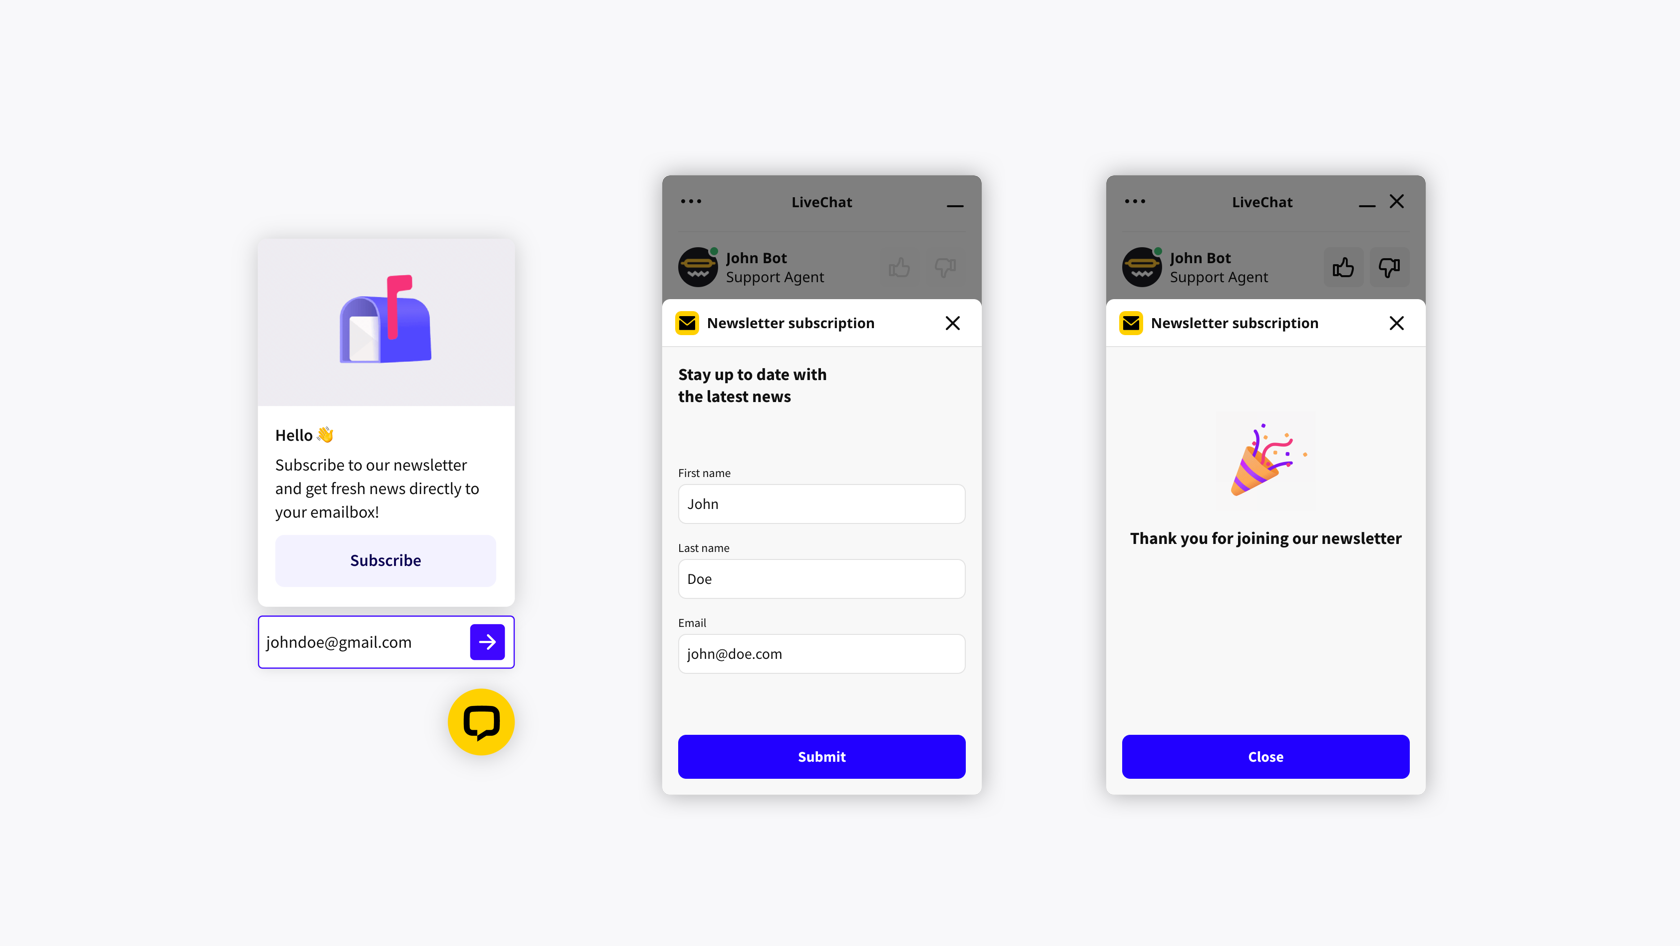
If you use Mailchimp, you can let your customers subscribe to your newsletter right from the announcement. The Mailchimp Newsletters announcement opens a subscription form right in the chat widget when the customer clicks on the Subscribe button.
In the LiveChat agent app, you define which audience the lead should be added to. So, once the customer clicks Submit, their email is added to the designated Mailchimp audience.
You need to have the Mailchimp Newsletters installed. Click here for setup instructions.
Once you have installed Mailchimp Newsletters, all that is left to do is edit your announcement. You can pick from the available templates or link to a custom image. The template comes with a preset Subscribe button that opens the subscription form. Once the look of the greeting is set, click on Next: set conditions. Set up the date when the announcement should be displayed, and which segment of your audience should the announcement target: first time or returning visitors, visitors coming from specific campaigns, visitors in specific countries, etc. This way you know exactly which customers you target, and their experience of signing up for your newsletter is virtually seamless.
Additional tips
Announcements are available in the Team, Business, and Enterprise plans. You can have up to ten Announcements at a time, so make sure to delete the ones you no longer need.
- Right now, an Announcement runs from the moment of creation until the specified date in the configuration. We are working on the option to set a custom starting date.
- Announcements will be displayed to the visitors who match the conditions set for them. Once you set up your announcement, make sure that its conditions don’t overlap with those of another targeted message in a way that can distract the visitor from your desired action.
- The Announcement is only delivered once for each customer, so the same user will not see it again.
- Enable “Multiple targeted messages” to make sure your customers will see the announcements and the greetings you set.
- To test newly created announcements, open your website using the incognito/private mode in your browser For Mac, press Command + Shift + N or P, depending on the browser. For Windows, press Control + Shift + N or P, depending on the browser.
- If you are using Groups (see this article for more information), always make sure that you are editing the announcements for the correct group. Groups can be picked from the drop-down menu in Settings> Engagement> Targeted messages.
- On mobile devices, Greetings are always displayed as a bubble
- If you want the greeting to be triggered when all conditions are met, choose “Match all of these conditions.” If you want it to be triggered when at least one of the conditions is met choose “Match one of these conditions.”